After eliminating all the other possibilities for kitchen counters, we decided that marble was the way to go. Many, many trips to marble yards and marble showrooms far and wide ensued, but we found the slab - at the place closest to home. This is Carrara marble, but the amount of grain and colour make it pretty unusual. The fellow who sold it to us said it was a pretty special shipment. I would recommend this company too. The lighting in the factory was really weird for this pic and nothing I could do in post processing seemed to help. Anyway, our kitchen counter will be white, not green as it appears here.
Thursday, January 24, 2013
November 23, and the fireplace is in! This is a gas fireplace from Marsh's, who were excellent to deal with. The nice thing was, as soon as the fireplace was installed, it was operational. I never thought I could have a fireplace in this house, so it's a lovely surprise.
The back wall blown out. This was a delicate procedure. We didn't want our second floor collapsing! Eventually the wall is removed. The door will move in so we can have room for a coat closet. There will be two windows. We considered three doors, two of which would open, but the cost was prohibitive so the architect designed an element where two windows and a door could look like one solid installation. This part was a custom order, doors and windows, so they will come in long after the other windows arrive. This is the last time we'll see this view for some time. The boards go up and we're pitched back into darkness. What a lucky break that we had unseasonally mild weather for this day!
The heating ducts for the back bedroom and office on the second floor. The duct on the right will give us some problems. In between these ducts we will be installing a gas fireplace, which will have a duct running below the left one to the back porch. On either side of the fireplace, cupboards; one for coats, and the other for stereo equipment. This will be our new living room. Essentially we are swapping kitchen/living room positions.
In this photo you can see how we doubled the ceiling joists. This was a requirement of the structural engineer. Our contractor doubled the joists, then he added another one to level the ceiling. He could have done those two steps at once, but he didn't. So in the words of our architect, we have "a lumber yard up there."
The back door and window are removed and boarded up, sort of.
There are the steel lintels for the back window element. That job was sub-contracted on the order of the engineer. We found specialists to do this part.
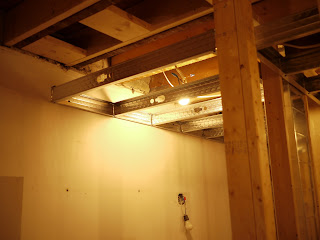
The front hall, showing the framing for the dropped ceiling. The hall and kitchen will have a dropped ceiling to differentiate them from the rest of the space, which is otherwise open.
Okay, so now the duct is beside the stack, but the stack still has a big old nasty bump up there which will force an ugly bend in the bulkhead, not great. Also, there is a piece of the old cast iron stack still there, attached to on either side by plastic - what the heck? I know it's hard to get at. I don't care! Get it out. Let's try that again.
Tuesday, January 22, 2013
The heating pipe is getting close to the soil stack. Close, but no cigar. Let's try that again.
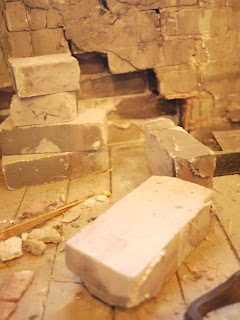
Removing the old layers exposed a bit of a structural problem in the corner. This part of the house is sinking and some of the interior brick has fallen into a hole. I think at one time, someone exposed this and just ignored it. We fixed it. These old beach houses are notorious for having sandy foundations and some of the more unlucky ones were built over underground ravines and flood regularly.
Above the window:
Fixing the hole:
Tearing up some of the subfloor to get at the pipes. The white pipe is the exhaust for the basement bathroom.
November 2012
The windows are removed. That pesky heating duct in the middle of the room remains. The old stove is gas and still hooked up.
The construction crew built a wall and boxed in the staircase to the second floor, enabling us to live dust free. Relatively. The front window is removed and boarded up.
Dining room window is boarded up and framing has begun. Since there is no view and little light from this window, it is being made smaller to accomodate a dining room buffet. Instead of bricking up the bottom, our architect has designed a painted panel element. This way, we don't have to match the old brick and move the sill.
Framing has begun.
Aha - the heating duct has been removed. Here is the replacement sneaking under the floorboards to the outside wall, to snug up to the sewage stack.
A new hall wall has been framed. This is the only wall that will be built in the space. We need it to make our new kitchen. The heating duct for the front bedroom is a nice skinny one to fit inside this wall. Eventually the fridge will go in this corner.
Looking more open. The fridge is moving about daily. The crew has strung up lights to work by.
A close up of the new heating duct. And my foot.
Gut has begun! This is the old front room (sitting room) As you can see, there is no insulation is this old beauty. There is double brick though, and some plaster/lathing. It looks dark and dingy.
The wall in the front hall has been removed. The shared wall will remain. Ceiling is exposed.
Front room and front door:
The back door:
We get to keep the fridge until the new floor goes in. This is a welcome surprise. The workmen will move it so they can work around it till then.
Front:
The stuff between the front and back! This is the old kitchen and a heating vent that went up to the second floor inside that wall. Some creative heating solutions will ensue.
The old floor was removed. And this is a close up of what remained - 1000s of tiny nails sticking up. I wondered if a quick trip to Canadian Tire for steel boots was in order. But they were all removed painstakingly the next day. I removed the ones that were in our path from the 2nd floor to the basement, where we had a makeshift kitchen. Oh yes, you heard me, we are living in the house through all this.
If you look closely you can see my husband is holding a bottle of wine. We have found that wine will get you through the most difficult of renovations.
October 2012 - Renovation Begins.
This is the front room (old sitting room) showing the house's original wood framing and plate rail. I am standing in the dining room. What a tired old carpet and that wallpaper - ugh! I can't believe at one time I liked that old fussy granny wallpaper. It's Laura Ashley.
The original front door. Drafty old mail slot. The door on the right of the picture goes into the above sitting room. Small, cramped and dark.
This is the original dining room.
View of the door in the sitting room and the window. This is the front of the house and the window overlooks the porch.
The dining room window, which used to have a view until the house next door was torn down and a higher house was built, with white aluminum siding, very nice view.
This is the exposed brick wall (shared with our neighbour semi) in the old kitchen. There were free standing cupboards against it for storage.
The back (south) wall in the old kitchen. The door leads to the back porch. You can see a bit of the old kitchen counter here.
The old kitchen with its mahogany cupboards. They served us well for over 20 years. A pretty cramped set up, not the best designed kitchen.
Subscribe to:
Posts (Atom)


